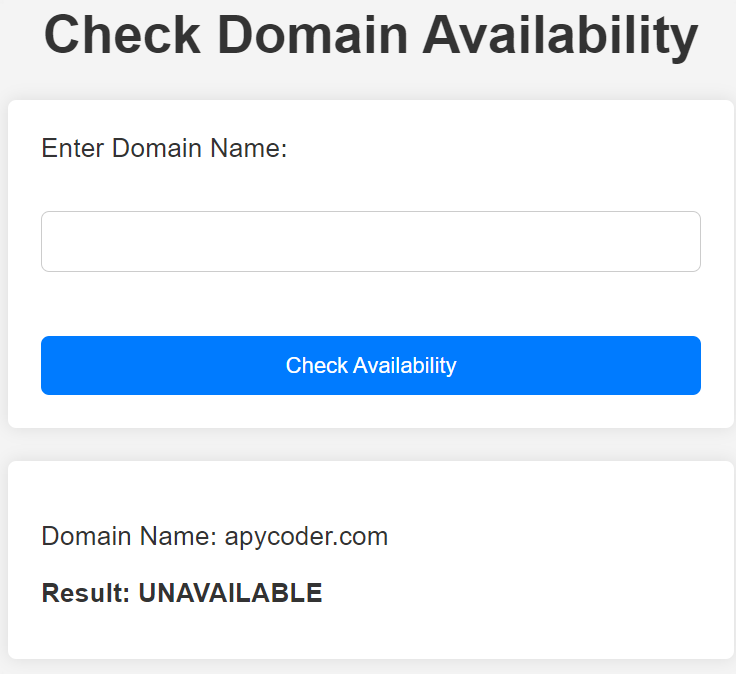
“Namaste! Welcome to our guide on checking domain availability with Django! In today’s digital age, getting just the right domain name is super important for any online venture. Be it launching a new website or expanding your online presence, Django gives you some powerful tools to make it all easier. In this tutorial, we’ll take you through the steps to create a domain availability checker using Django, so you can easily find the perfect domain for your project. Chalo, let’s get started!”
To begin, ensure you have Django and the requests library installed. Here’s how you can do it:
- Install Django: You can install Django using pip, Python’s package installer. Open your terminal or command prompt and enter the following command:
pip install django - Install Requests Library: Similarly, install the requests library by running:
pip install requests
Once you’ve installed Django and the requests library, you’re ready to create your Django project. Follow these steps:
- Create a Django Project: Open your terminal or command prompt and navigate to the directory where you want to create your Django project. Then, run the following command:
django-admin startproject myprojectReplace “myproject” with the desired name of your Django project. - Create a Django App (Optional): You can create a Django app within your project. Navigate to your project directory in the terminal and run:Copy code
python manage.py startapp myappReplace “myapp” with the name you want to give to your Django app. - Views.py:
views.py
# views.py
from django.shortcuts import render
import requests

def check_domain_availability(request):
    result = None
    if request.method == 'POST':
        api_key = "YOUR API KEY HERE"  # Get API KEY form here https://user.whoisxmlapi.com/settings/general
        domain_name = request.POST.get('domain_name', '')
        if domain_name:
            url = f"https://domain-availability.whoisxmlapi.com/api/v1?apiKey={api_key}&domainName={domain_name}&credits=DA"
            response = requests.get(url)
            data = response.json()
            if "ErrorMessage" in data:
                result = {'available': False, 'message': data["ErrorMessage"]}
            else:
                domain_info = data.get("DomainInfo")
                if domain_info is not None:
                    availability = domain_info.get("domainAvailability")
                    if availability is not None:
                        result = {'available': True, 'message': availability, 'domain': domain_name}  # Pass domain name here
            if result is None:
                result = {'available': False, 'message': "Unknown availability"}
        else:
            result = {'error': 'Domain name not provided'}

    return render(request, 'check_domain.html', {'result': result})
- Now, you can add the provided code to your
views.pyfile within your Django app. This code defines a view functioncheck_domain_availabilitythat checks the availability of a domain using the WHOIS XML API.
Remember to configure your Django project’s settings, including database settings and URL routing, according to your requirements. Additionally, you’ll need to create a template file named check_domain.html in your app’s templates directory to render the result.
urls.py
from django.urls import path
from . import views

urlpatterns = [
    path('', views.check_domain_availability, name='check_domain_availability'),
]
check_domain.html
<!-- check_domain.html -->
<!DOCTYPE html>
<html lang="en">
<head>
    <meta charset="UTF-8">
    <meta name="viewport" content="width=device-width, initial-scale=1.0">
    <title>Check Domain Availability</title>
    <style>
        body {
            font-family: Arial, sans-serif;
            background-color: #f4f4f4;
            margin: 0;
            padding: 0;
        }

        h1 {
            text-align: center;
            margin-top: 50px;
            color: #333;
        }

        form {
            max-width: 400px;
            margin: 0 auto;
            background-color: #fff;
            padding: 20px;
            border-radius: 5px;
            box-shadow: 0 0 10px rgba(0, 0, 0, 0.1);
        }

        label {
            display: block;
            margin-bottom: 10px;
            color: #333;
        }

        input[type="text"] {
            width: 100%;
            padding: 10px;
            margin-bottom: 20px;
            border: 1px solid #ccc;
            border-radius: 5px;
            box-sizing: border-box;
        }

        input[type="submit"] {
            width: 100%;
            padding: 10px;
            background-color: #007bff;
            color: #fff;
            border: none;
            border-radius: 5px;
            cursor: pointer;
            transition: background-color 0.3s ease;
        }

        input[type="submit"]:hover {
            background-color: #0056b3;
        }

        .result {
            max-width: 400px;
            margin: 20px auto;
            background-color: #fff;
            padding: 20px;
            border-radius: 5px;
            box-shadow: 0 0 10px rgba(0, 0, 0, 0.1);
        }

        .result p {
            margin-bottom: 10px;
            color: #333;
        }

        .available {
            color: #007bff;
            font-weight: bold;
        }

        .not-available {
            color: #dc3545;
            font-weight: bold;
        }
        .result {
    max-width: 400px;
    margin: 20px auto;
    background-color: #fff;
    padding: 20px;
    border-radius: 5px;
    box-shadow: 0 0 10px rgba(0, 0, 0, 0.1);
}

.result p {
    margin-bottom: 10px;
    color: #333;
}

.result .domain {
    color: #007bff;
    font-weight: bold;
}

.result .available {
    color: rgb(0, 255, 17);
    font-weight: bold;
}

.result .not-available {
    color: #dc3545;
    font-weight: bold;
}

    </style>
</head>
<body>
    <h1>Check Domain Availability</h1>
    <form action="" method="post">
        {% csrf_token %}
        <label for="domain_name">Enter Domain Name:</label><br>
        <input type="text" id="domain_name" name="domain_name"><br><br>
        <input type="submit" value="Check Availability">
    </form>

    {% if result %}
    <div class="result">
        <p>Domain Name: <span class="domain">{{ result.domain }}</span></p>
        <p class="{% if result.available %}available{% else %}not-available{% endif %}">Result: {{ result.message }}</p>
    </div>
{% endif %}
</body>
</html>
That’s it! You’re now set up to check domain availability using H. Don’t forget to run your Django development server using python manage.py runserver and access your application through the provided URL.

