Hello, fellow coders! Asif Khan here, and today, I’ll guide you through the process of uploading custom files in WordPress without relying on a plugin. Let’s dive into the step-by-step procedure:
Step 1: Access Your Hostinger Dashboard
- Log in to your Hostinger dashboard.
- Navigate to the File Manager section.

Step 2: Explore the File Structure
- Once in File Manager, go to
public_html. - Click on
wp-content.

Step 3: Choose Your Theme
- Within
wp-content, locate thethemesdirectory. - Choose the currently activated theme; in my case, I’m using the Astra theme.
Step 4: Edit the functions.php File
- Double-click on the Astra theme to access its files.
- Open the
functions.phpfile.
Step 5: Insert the Custom Code
Add the following code to the functions.php file:
// Add this code to functions.php

// Create the database table
function create_form_table() {
    global $wpdb;
    $table_name = $wpdb->prefix . 'applicant_data';

    $charset_collate = $wpdb->get_charset_collate();

    $sql = "CREATE TABLE IF NOT EXISTS $table_name (
        id mediumint(9) NOT NULL AUTO_INCREMENT,
        full_name varchar(255) NOT NULL,
        address varchar(255) NOT NULL,
        resume_path varchar(255) NOT NULL,
        PRIMARY KEY  (id)
    ) $charset_collate;";

    require_once(ABSPATH . 'wp-admin/includes/upgrade.php');
    dbDelta($sql);
}

// Handle form submission
function handle_form_submission() {
    if (isset($_POST['submit_form'])) {
        global $wpdb;

        $table_name = $wpdb->prefix . 'applicant_data';

        $full_name = sanitize_text_field($_POST['full_name']);
        $address = sanitize_text_field($_POST['address']);

        // Handle File Upload
        if (isset($_FILES['resume'])) {
            $uploaded_file = $_FILES['resume'];

            $upload_dir = wp_upload_dir();
            $upload_path = $upload_dir['path'];
            $resume_path = $upload_path . '/' . $uploaded_file['name'];

            move_uploaded_file($uploaded_file['tmp_name'], $resume_path);

            // Save to Database
            $wpdb->insert(
                $table_name,
                array(
                    'full_name'   => $full_name,
                    'address'     => $address,
                    'resume_path' => $resume_path,
                )
            );

            // Optionally, you can redirect the user after form submission
            wp_redirect(home_url('/thank-you/'));
            exit();
        }
    }
}

// Initialize the table and form submission
add_action('init', 'create_form_table');
add_action('init', 'handle_form_submission');


// functions.php

function display_applicant_data() {
    global $wpdb;

    $table_name = $wpdb->prefix . 'applicant_data';
    $data = $wpdb->get_results("SELECT * FROM $table_name");

    if ($data) {
        echo '<table>';
        echo '<tr><th>ID</th><th>Full Name</th><th>Address</th><th>Resume</th></tr>';
        foreach ($data as $row) {
            echo '<tr>';
            echo '<td>' . $row->id . '</td>';
            echo '<td>' . $row->full_name . '</td>';
            echo '<td>' . $row->address . '</td>';
            echo '<td><a href="' . $row->resume_path . '" target="_blank" download>Download Resume</a></td>';
            echo '</tr>';
        }
        echo '</table>';
    } else {
        echo 'No data found.';
    }
}
add_shortcode('display_applicant_data', 'display_applicant_data');
Remember to save the file after pasting the code.
Step 6: Create a New Page in WordPress
- Go to the WordPress admin area.
- Create a new page where users will submit the form.
Step 7: Add the Submission Form HTML
Paste the HTML code for the submission form:
<!-- HTML Form -->
<style>
    form {
        max-width: 400px;
        margin: 0 auto;
        background-color: #f9f9f9;
        padding: 20px;
        border-radius: 10px;
        box-shadow: 0 0 20px rgba(0, 0, 0, 0.1);
    }

    label {
        display: block;
        margin-bottom: 8px;
        color: #333;
        font-weight: bold;
    }

    input[type="text"],
    input[type="file"] {
        width: 100%;
        padding: 12px;
        margin-bottom: 20px;
        border: 1px solid #ccc;
        border-radius: 6px;
        box-sizing: border-box;
        font-size: 14px;
    }

    input[type="submit"] {
        background-color: #4caf50;
        color: #fff;
        padding: 15px 20px;
        border: none;
        border-radius: 8px;
        cursor: pointer;
        font-size: 16px;
        transition: background-color 0.3s;
    }

    input[type="submit"]:hover {
        background-color: #45a049;
    }
</style>

<form method="post" action="" enctype="multipart/form-data">
    <label for="full_name">Full Name:</label>
    <input type="text" name="full_name" required>

    <label for="address">Address:</label>
    <input type="text" name="address" required>

    <label for="resume">Resume Upload (PDF, DOC, DOCX):</label>
    <input type="file" name="resume" accept=".pdf, .doc, .docx" required>

    <input type="submit" name="submit_form" value="Submit">
</form>
This will render a visually appealing form for users to submit.

Step 8: Create a “Thank You” Page
- Create another page for users to be redirected to after submission, commonly known as the “Thank You” page.
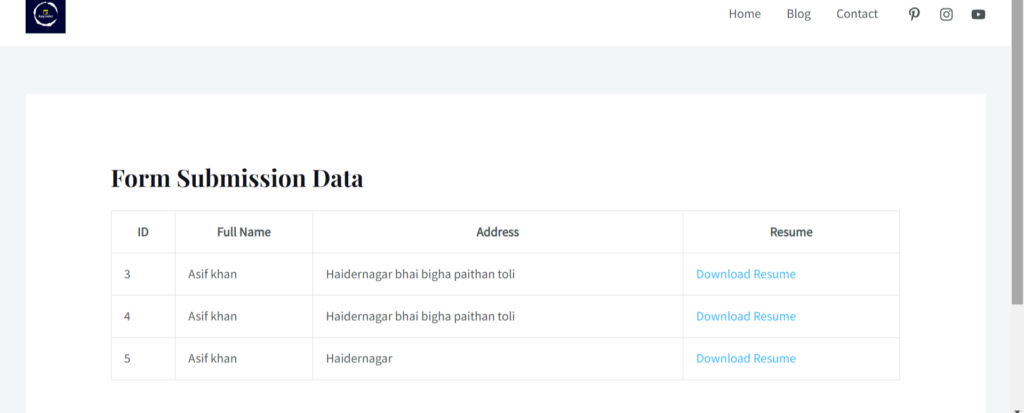
Step 9: View Submission Data
- Create a new page and use the shortcode
[display_applicant_data]to display all submission data.


And there you have it! A professional and user-friendly method to upload files in WordPress without relying on plugins. Happy coding!
Thank You for Visiting!
Thank you for taking the time to explore this tutorial! Your support means a lot to us. If you found this guide helpful, consider subscribing to our YouTube channel for more WordPress tutorials and coding tips.
Additionally, if you’re interested in streamlining your development process, check out our premium template source code ebook available for purchase. Happy coding!

