Connecting a Django application to an Arduino via a COM port allows you to create innovative projects that blend web technologies with hardware control. In this blog post, we’ll walk through the steps needed to establish this connection, enabling you to control your Arduino board from a Django web application.
What You’ll Need
- Django: A robust Python web framework.
- Arduino: A versatile microcontroller board.
- PySerial: A Python library for serial communication with the Arduino.
- Arduino IDE: To program the Arduino.
Preparing the Arduino
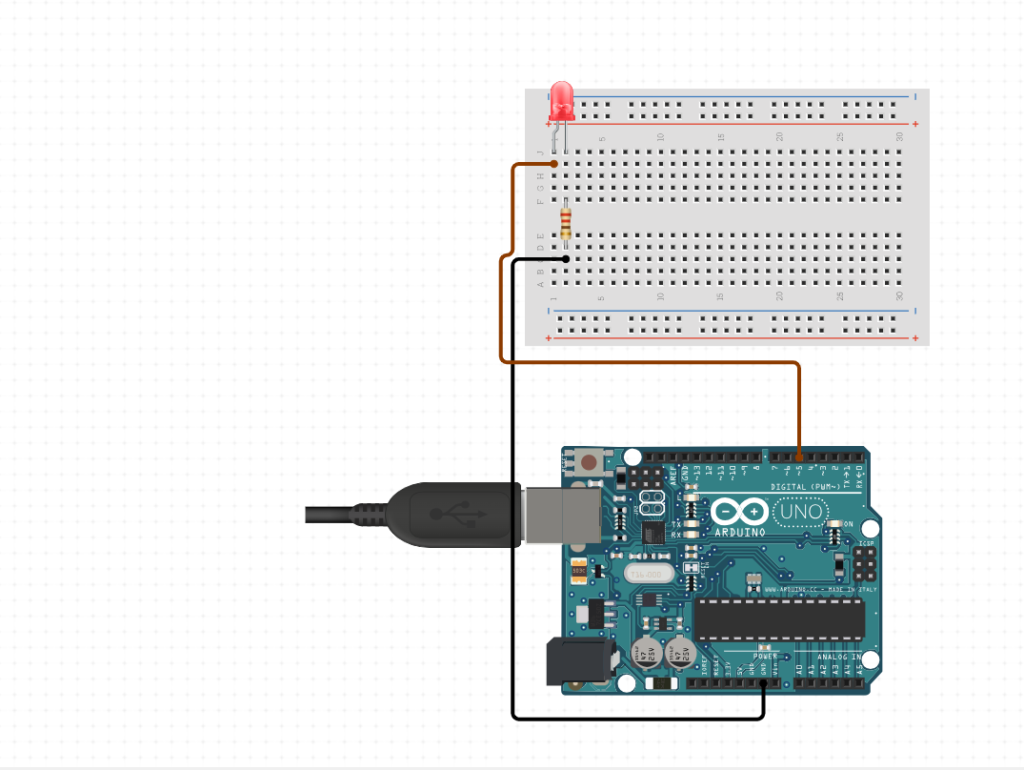
First, configure your Arduino to listen for commands over the serial port. Here’s a basic example of an Arduino sketch that toggles an LED based on serial input:
int ledPin = 5;

void setup() {
    pinMode(ledPin, OUTPUT);
    Serial.begin(9600);
}

void loop() {
    if (Serial.available() > 0) {
        char command = Serial.read();
        if (command == '1') {
            digitalWrite(ledPin, HIGH); // Turn LED on
        } else if (command == '0') {
            digitalWrite(ledPin, LOW); // Turn LED off
        }
    }
}
Upload this code to your Arduino using the Arduino IDE.
Circuit Design

Installing PySerial
To enable Django to communicate with the Arduino, install the PySerial library:
pip install pyserial
Creating the Django View
Next, we’ll create a Django view to send commands to the Arduino. Below is an example:
from django.shortcuts import render
from django.http import HttpResponse
import serial

def control_led(request):
    if request.method == 'POST':
        command = request.POST.get('command')

        # Adjust the COM port and baud rate to match your Arduino settings
        ser = serial.Serial('COM3', 9600)
        ser.write(command.encode())
        ser.close()

        return HttpResponse('Command sent to Arduino')

    return render(request, 'control_led.html')
This view reads a command from a POST request, sends it to the Arduino via a serial connection, and then closes the connection.
Creating the HTML Template
Create an HTML template to provide an interface for sending commands to the Arduino:
<!DOCTYPE html>
<html>
<head>
    <title>Control Arduino LED</title>
</head>
<body>
    <h1>Control Arduino LED</h1>
    <form method="POST">
        {% csrf_token %}
        <button type="submit" name="command" value="1">Turn On</button>
        <button type="submit" name="command" value="0">Turn Off</button>
    </form>
</body>
</html>
Configuring URLs
Add a URL pattern to route requests to your new view. Update your urls.py:
from django.urls import path
from .views import control_led

urlpatterns = [
    path('control_led/', control_led, name='control_led'),
]
Testing the Connection
Start the Django development server:
python manage.py runserverNavigate to http://127.0.0.1:8000/control_led/ in your web browser. You should see buttons to turn the LED on and off. Clicking these buttons will send commands to the Arduino via the serial port.
Conclusion
Following these steps, you can seamlessly connect your Django application to an Arduino via a COM port, allowing for innovative projects that integrate web technologies with hardware control. This opens up a world of possibilities for IoT projects, home automation, and more.
Eager to Explore More in Django and Arduino?
Visit my YouTube channel for detailed tutorials and insights. Subscribe here for the latest updates and coding adventures!
For a more comprehensive learning experience, check out my ebook. It’s not just a book; it’s a blueprint for success! Get your copy here and take your development journey to the next level.
Happy coding with Django and Arduino!
